Share
Chronic SI joint pain is no fun, so here are some techniques to try to realign the pelvis and get rid of the pain.
Before we get to the topic at hand, I want to announce that my long awaited nutrition course entitled “Why the Food Guides are Wrong: How to Find Health and Lose Weight”, is now available online. By the end of the roughly two hours it takes to go through the course, your confusion over food and what is healthy to eat will have disappeared because the lens through which you look at food will have changed.
Suddenly the conflicting nutrition messages that are everywhere won't be a problem anymore and you won't be pulled from one diet to another depending on what diet guru you happen to be listening to at the time. Everything will seem so obvious that you will wonder how you could have possibly been confused before. I echo Paul Chek’s suggestion that food is the drug we take three times a day. Eat poorly and your health will be taken from you. Eat right and your health will be restored.
The feedback I have received from people that have attended the course in the past have included sentiments like "life changing", and "I didn’t really expect to learn anything, but found out I didn't know anything at all", and “I don’t think I’ll bother taking the other nutrition course I signed up for – I now know all I need to know”. People have come up to me months after taking the course and thanked me for the presentation and changing their lives.
Sign up by going to http://WellnessTips.digitalchalk.com.
Now to the topic of SI joint pain. Thursday I was sitting at a coffee shop in a business meeting with a colleague without the “butt lift” that I need (one side of my pelvis is slightly smaller than the other, so I usually sit with a pad under one sit bone to keep my pelvis level), and I felt my SI joint go out of alignment. Instantly I was back to that left-sided low-back pain I had felt on a daily basis many years ago.
That night I was lying in bed thinking how ironic it was that the following day I would have no time in my day to fit in a chiro appointment to realign my pelvis and resolve my pain, because it was jammed with people coming to see me to fix their back problems. Aarg! I don't have time for back pain!
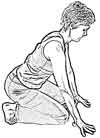
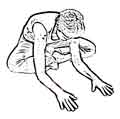
I decided that surely I knew enough about the SI joint to fix myself, even if I couldn’t assess myself properly to determine exactly what had happened. So at three in the morning I was crawling around the floor in the dark with my cat, trying to fix my back.
If the SI joint hurts, chances are mighty good that the pelvis is out of alignment. The pelvis forms a ring, with the two outside bowl-like bones (iliums) hugging the triangular sacrum in between them in the back, and the transversus abdominis muscle completing the top of the ring, the pubic bone the bottom of the ring in the front.
The sacroiliac joints are held together with very strong ligaments, but the joints are supposed to move a bit as we move. If the pelvis ring distorts to any greater degree than is appropriate for the SI joints, pain can result.
 For those of you interested in the technical stuff, keep reading, and those of you that just want to get to the exercises, skip to below.
My pain was exactly where it used to be – left SI joint, and I remembered over ten years ago, when I took Diane Lee and LJ Lee's low back, hip and pelvis course (which changed my life by taking me out of chronic pain), Diane Lee told me that my right sacral multifidus (very deep muscle that stabilizes the spine and sacrum) had atrophied greatly and was not firing at all.
With nothing pulling the right side of the sacrum back, the sacrum would then be free to rotate to the left within the iliums, and this in turn would create an inflare of the left ilium (ASIS moving medially), and an outflare (ASIS moving laterally) of the right one, as they are tugged out of place by the ligaments attached to the now faulty positioned sacrum.
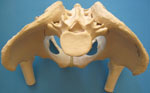
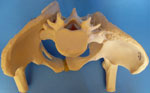
Lying on my back, I felt my sacrum, and sure enough I had to go further to hit bone on the right side than the left, indicating to me that probably my sacrum had rotated to the left. And if the sacrum was rotated left, I figured my lumbar spine probably was as well. Please note the image on the left shows a nicely aligned pelvis, and the image on the right shows a right inflare pelvic distortion.
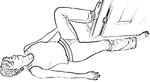
I needed to pull the left ilium back out, and rotate the sacrum and spine back to straight. So I lay down with my left side about 6 to 8 away from a wall, bent the knee of my left leg and pushed it into the wall for 10 to 15 seconds, activating my left external hip rotators to try and correct the left inflare.
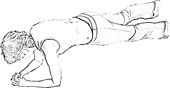
After repeating this a few times, and I turned my attention to my sacrum. I got into an elbow plank, body straight, legs straight, toes firmly connected to the ground, and I lifted my right foot reaching it back to activate the right multifidus, but more importantly to activate the left psoas via the left foot stabilizing me, since it attaches to the front of the spine and would be very powerful in rotating it back to neutral.
I did as many 10 second holds as I could manage while maintaining excellent form. I then did the Don Tigny knee brace a few times on each side to ensure my SI joints were in their best position and I finished off by doing some Swiss ball supermans, to make sure I was connectng to my multifidus and other deep local stabilizers properly. I then went back to bed. The next morning my back felt much better!
If you have SI joint pain, these mobilizations may help, but please understand that there are many pelvic distortions so there are no guarantees. If you decide to try these, you are making the choice to try these without being assessed first. They may not be right for you at all if your back pain is more complicated than simply an SI joint problem.
To be safe, see a physical therapist to find out if these exercises are appropriate for you. I think the may work if your distortion is an obliquity of the pelvis – an inflare/outflare distortion. If you do find these mobilizations helpful to realign your pelvis, do them before you do your stabilization exercises.
If your SI joint continually goes out, you are doing your stabilization exercises correctly and you have been doing them for a while, there is probably an underlying problem such as an organ adhesion or an anatomical leg length discrepancy or smaller hemipelvis on one side that is putting constant stress on the SIJ and needs to be sorted out. Call Neurosomatic Educators at 1-866-597-3772 to find an Integrated Neurosomatic Therapist near you to find out if this is why you can't get better.
 1) Dontigny knee brace: Lie on your back in a doorway, one foot on the door jamb, knee pointing slightly out to the side, other leg reaching into the other room. Push through your heel into the doorjamb using your buttocks and hamstrings. Push for 6 seconds, rest for 6 seconds, repeat 6 times. Move over to other side of doorway and do the other side. This alone may do wonders for SI joint pain. If this has helped, leave out exercise 2 and 3 and skip to the Swiss ball superman.
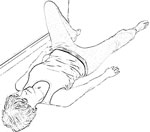 2) Inflare correction: Do on the SORE side. If both sides are sore, don't do this at all. Lie with sore side about 6 to 8 inches away from a wall, knee bent, foot on the floor, other leg straight. Push side of knee into the wall, activating the hip muscles on the sore side. Allow your trunk to rotate the other way. Push for 6 seconds, rest for 6 seconds, repeat 6 times or more.
 3) Plank: This is a VERY challenging exercise so evaluate your abilities carefully before attempting this! You can modify it by doing a plank from the knees if you need to. Get into an elbow plank (or high plank on the hands if you prefer), making sure the trunk is straight from the shoulders to the toes or knees. The hips are not hiking way up into the air. If you are able to, lift and reach the leg of the side that is NOT sore, without allowing anything to move in the pelvis. You should feel the front of the hip working hard on the sore side. This will work even better if you can turn the tops of the toes under like a yoga up-dog to do this, but very few people have that kind of flexibility. If you can't lift the leg, push the SORE side toes or knee into the floor for 6 to 10 seconds, feeling the front of the hip working. Hold the position for 6 to 10 seconds, rest for 6 to 10 seconds, and repeat if possible. Do NOT do the opposite side. If both sides are sore, just do a plank without lifting your legs.
 4) Swiss Ball Superman: Balance your belly on a small Swiss ball such that you have even weight between your hands and feet, and your spine remains neutral. Anchor those toe pads down and feel the connection to your pelvic floor. Lift the "not sore" leg and reach it back without allowing your trunk to rotate or side-bend on the ball, and without allowing the ball to move. If you are successful, lift the opposite arm off the floor and reach it forward without allowing any movement in the trunk or ball. Hold for 6-10 seconds and repeat. If your trunk or ball is moving, you are not stabilizing correctly, so try smaller movements, and check to make sure you are holding in your pelvic floor. Sometimes it helps to do the "easy" side a few times, to teach the brain how to connect for the "hard" side. If both sides are sore, do both sides equally.
I suggest finishing off with the Don Tigny knee brace again. If these exercises work, do them a few times a day. If you have longstanding SI joint pain and the bones simply won't move, see a soft-tissue therapist before trying again.
There, you see? Sometimes pain serves a purpose. Forced me to think hard, and I think I learned something useful because of it. Movement practitioners out there, feel free to comment and let me know if you think I am completely out to lunch on this, or if you have found anything else that works well that you would like to share. And those with SI joint pain, feel free to let me know if these ideas work for you … or if they don't.
If you want to share this article, scroll to the very bottom and click the “share” icon to post on Facebook, Twitter etc. If you want to subscribe or search for other posts by title or by topic, go to www.wellnesstips.ca.
Related Tips
Foot flexibility important to reducing hip and SI joint pain
Walking, sacroiliac dysfunction and hip pain
Posture, leg-length discrepancies, musculoskeletal pain and organ function
Pain and stabilizer vs mover muscles
Lee, Diane
The Pelvic Girdle Churchill Livingston, 2004.
Travell, Janet and Simons, David Myofascial Pain and Dysfunction: The Trigger Point Manual; Vol. 2., The Lower Extremities Williams and Wilkins, PA. USA, 1983.
Lee, Diane and Lee, Linda Joy An Integrated Approach to the Assessment and Treatment of the Lumbopelvic-Hip Region DVD, 2004
Lee, Diane and Lee, Linda Joy Postpartum Health for Moms – An Educational Package for Restoring Form and Function after Pregnancy CD ROM 2006.
St. John, Paul and Clark, Randall, and Jones, Tracy Integrative Approaches to Low Back Pain Neurosomatic Educators
Lee, Diane Assessment Articular Function of the Sacroilac Joint VHS
Lee, Diane Exercises for the Unstable Pelvis VHS
Richardson, C, Hodges P, Hides J.Therapeutic Exercise for Lumbopelvic Stabilization: A Motor Control Approach for the Treatment and Prevention of Low Back Pain Churchill Livingston 2004.
DonTigny, Richard Pelvic Dynamics and the subluxation of the sacral axis at S3 The DonTigny Method.
Myers, Thomas Body Cubed, A Therapist’s Anatomy Reader “Poise: Psoas-Piriformis Balance†Massage Magazine, March/April 1998.
Myers, Thomas Body Cubed, A Therapist’s Anatomy Reader “Fans of the Hip Joint†Massage Magazine, Jan/Feb 1998.
Myers, Thomas Anatomy Trains: Myofascial Meridians for Manual and Movement Therapists Churchill Livingston, 2001
Chek, Paul CHEK Level 1 Advanced Back Training Chek Institute.
Johnson, JimThe Multifidus Back Pain Solution: Simple Exercises That Target the Muscles That Count New Harbinger Publications Inc. Oakland CA, 2002.
Lee, Diane Understanding your back pain – an excellent article explaining the concept of tensegrity and its importance in stabilizing the pelvis and spine.
DeRosa, C.Functional Anatomy of the Lumbar Spine and Sacroiliac Joint 4th Interdisciplinary World Congress on Low Back & Pelvic Pain, Montreal, 2001.
Copyright 2010 Vreni Gurd
To subscribe go to www.wellnesstips.ca
 Squatting is the movement we do when we sit down on a chair and get back up again. In many parts of the world, squatting right to the floor is common practice. People may squat while cooking over a fire, while reading the newspaper, or while using a squat toilet. In my opinion, squatting to the floor regularly is very helpful in maintaining happy hips, knees and ankles.
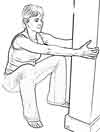
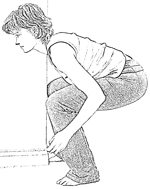 The "knees behind the toes" requirement fixes the angle at the ankle; the longer the lower leg, the higher the ankle angle. This forces the hips very far back, and to avoid falling over, the only way to compensate is to bend the hip joint much more than usual in order to get the center of gravity back over the feet again. This movement looks more like a deadlift (bend) than a squat. In the diagram to the right, the foot and knee are butted up against a wall, and one can easily see how there is far more bend at the hips than at the knee and ankle. The spine is at a much flatter angle than the lower leg.
  Our knees are meant to bend to the point where the back of the thighs can easily rest on the calves. With adequate flexibility, one can kneel on the floor like this putting a fair bit of pressure through the legs without any problem. The knee joint is open, so the thigh bone (femur) and lower-leg bone (tibia) are not rubbing on each other at all in this position. Any strain in the knee area would come from tight muscles, tendons, and fascia. Flexibility is the limiting factor in this case, and that can be slowly improved over time. The limits put on a squat should be determined by one’s own flexibility rather than an arbitrary rule like “knees must stay behind the toes”.
 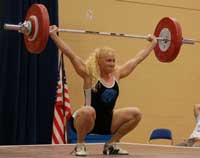 Olympic lifters regularly pass through the front squat position with a very heavy bar, and their knees are often past their toes. They have the flexibility in their legs and back to be able to do the movement without a problem.
 One should think of squatting like folding up an accordion. One stays over the center of gravity (the feet), the knees hinge forward tracking over the toes, the hips hinge back, the trunk goes forward again. The spine parallels the shin angle, remains neutral, and is not contorted at all since the hinge is at the hips. This is what we naturally do when we sit down and get up from a chair, so this is the best place to begin a squatting practice.
 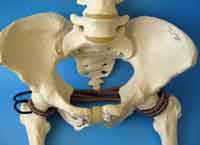 Although not in the right place to mimic piriformis properly, the bungee cord in the photo simulates a butt gripping strategy, and one can clearly see how this opens the top of the SI joint. This might also destabilize the joint between the top of the sacrum and the lowest vertebrae, and possibly the lumbar spine further up. Also, the piriformis might pull the front of the lower sacrum forward, unlocking the SI joint, destabilizing it. Massaging the external hip rotator muscles will help temporarily, but until one stops using a butt gripping strategy the pain will not go away permanently.
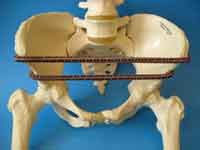 In order to stop butt gripping permanently, one must replace the butt-gripping stabilization strategy with one that is more optimal. Ideally we want to create a ring of support around the top of the pelvis by using the deepest abdominal muscle called the transversus abdominis. Notice in this photo how the bungee cord simulating the action of transversus abdominis, closes the SI joint, and how using this muscle would stabilize the pelvis in a way that does not compromise the ability of the legs to move freely. This muscle, along with co-contraction of multifidus and the pelvic floor form the optimal way to stabilize the low back and SI joint.
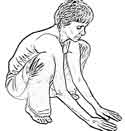
 1. Squat to the Floor We should be able to easily spend time in a deep squat keeping our heels down without falling backwards, body leaning between the legs as if we were pooping in the woods. If you cannot do this, try holding onto a sturdy post and lower yourself down leaning back just enough to keep your heels on the floor. You can always sit on a low step-stool for extra support and to make the position more relaxing. Keep your knees in line with your toes, ease into a stretch and wait for it to dissipate. In addition to pushing through your feet you can use your arms to help pull you up when you are done. (Please note: NEVER do a squat to the floor with added weight. Avoid if you have a disk problem in your back.)
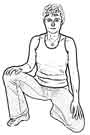
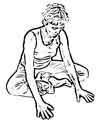
 2. Tripod Split Squat From the squat position above, drop one knee to the floor and sit on the heel of that foot. This position is comfortable and stable as you have created a triangle on the ground with the points being one knee, the toes of the same leg and the other foot. Make sure you switch sides to work on both legs. This is the ideal position for lifting heavy objects off the floor as one can straddle the object being lifted thereby keeping it close to our body, the spine has a neutral curve, and it forces the use of the legs rather than the back to get up. But it requires good toe flexibility which is usually the limiting factor in this position. If this is too painful, work on your toe flexibility by going onto all 4s, tucking your toes under and leaning back until you can sit on your heels. Toe spreaders can also be very helpful.
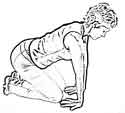
 4. Cross-legged sit with forward bend Sit down on the floor and bring one heel into your perineum, and the other heel just in front of that foot. Your knees should be wide and your legs should feel relaxed. If not, try sitting on a phone book or pillow so that your knees are lower than your pelvis. Now lean forward and if possible, rest your elbows and forearms on the floor in front of you, keeping your sit bones down. If not possible, rest your hands on the floor. Avoid the temptation to look up, which would shorten the back of the neck. Most likely you will feel a stretch in the hip of the forward leg, and possibly the inner thighs and low back. Switch the feet to keep the other hip limber too. (Avoid bending forward if you have a disk problem.)
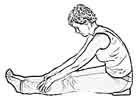 5. Seated forward fold Sit tall on your sit bones on the floor with your legs stretched out in front of you. If possible, gently fold forward keeping the knees soft and collar bones wide, until you feel a mild stretch in the back of your legs. Some people are able to relax with their chest on their thighs, while many of us may not be able to fold forward at all. If you are sitting behind your sit bones, sit on a phone book or pillow to raise you enough to make it possible for you to relax on your sit bones. Sitting on a block with your back against a wall to provide some support may be a very good starting point as one can easily relax and spend time in that position. (If you have a disk problem you need hamstring stretching, but this is not the best choice for you. See a physio, CHEK Practitioner or personal trainer who can teach you a hamstring stretch that keeps your spine in neutral.)
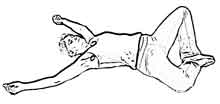 6. Supine butterfly with T-Y-I relax Lie on the floor on your back and lean the soles of your feet into each other, heels close to the perineum, possibly creating a stretch in your inner thighs. If the stretch is too great for the inner thighs, play with the distance your heels are from your perineum, or use pillows for support under your knees. If your head is tilted back to reach the floor, use a pillow so you can keep the plane of your face horizontal. Hopefully eventually you won't need the pillow. Rest your arms out to the side like the letter T, raising them up as high as you can while keeping them on the floor. Perhaps you will be forming the letter Y with your arms and trunk. The goal is to eventually have your upper arms up against your ears like the letter I, yet relaxed on the floor and feeling no stretch in your chest or armpits.
 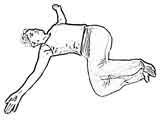 7. Supine torso twist Lie on your back with your arms out to the side, knees bent, feet on the floor. Push through the feet to lift the pelvis up, and place it on the floor slightly to the left. Drop the knees to the right towards the floor, keeping the shoulder-blades down, possibly feeling a stretch in the left side and buttock. Ideally you should be able to relax with the legs on the floor in this deep twist. If you cannot, put pillows under your legs to support them so that you can relax, but still feel a stretch. Do the other side as well.
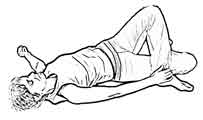 8. Ankle across knee torso twist Lie on your back with your arms out to the side, right knee bent, foot on the floor, left ankle resting on the right thigh so the left knee is pointing out to the side. Slowly drop the right knee down to the right side so that the left foot ends up on the floor and you can hang onto it with your right hand. The left knee should just hang away from the body. You may feel a stretch in the front or side of the left hip. Use pillows for support if needed. Do the other side.
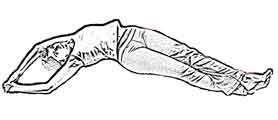 9. Supine C stretch Lie on your back with your legs stretched out, and your hands clasped overhead. Move your legs and arms to the same side so you are taking the shape of a banana, but do not allow your pelvis to rotate. Cross the foot of the leg that is on the outside side of the curve over the foot of the inside leg, relax and feel a gentle stretch through the lateral line of of the body. If you feel any discomfort in your pelvis, try holding in your pelvic floor as if you were stopping the flow of urine and draw in the tissue just above the pubis. Notice any differences side to side.
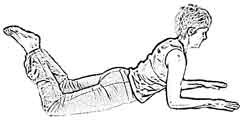 10. Sphinx with lower legs up Lie on your belly and come up onto your elbows, forearms and hands facing forward, elbows at 90 degrees, while keeping your pelvis on the floor. Keep the back of the neck long, chin drawing into the front of the neck slightly. Try to arch your upper back by keeping the collar bones wide, lifting your sternum up and through your arms and feeling a stretch in the belly. If this is comfortable for your low back, try bending your knees so the flats of your feet are facing the ceiling. This position should be quite restful, but if your low back is bothering you, only come up as high as is comfortable, and try supporting your pelvis by drawing in the tissue just above the pubis. For some, lying on the floor with the forehead on the hands may be all that can be initially tolerated. Find the position you can relax in and progress from there.
 Facebook Wellness-Tips Page
 Design by